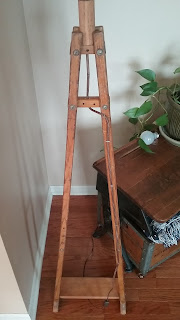
Vintage Crutches Lamp Upcycle
For those of you that don't know me or maybe for those that have lost touch, I have developed a new love for forgotten treasures, or "junk" as skeptics like to call it. My grandmother's most lasting impression upon me was her infamous knack for saving money and getting the absolute most out of everything.
"Use it up, wear it out, make do, or do without."
I must admit, I am terrible at the "do without" part. I am notorious for going to estate sales and flea markets and justifying every purchase with the simple phrase:
"I need it."
Not only is the untrue, it is also becoming a problem as I am collecting faster than I am re-homing.
Such is life I suppose.
The purpose of today's post is to showcase one of my most recent and most loved upcycles.
A floor lamp made from vintage crutches!
The purpose of today's post is to showcase one of my most recent and most loved upcycles.
A floor lamp made from vintage crutches!
Lighting fixtures are probably my favorite things to make out of my vintage finds. I couldn't tell ya why though. Maybe because they brighten my world?!
Okay you're right, that was cheesy.
I got the idea from this Pinterest post, but there wasn't a tutorial accompanying it so I kind of had to wing it. I figure this post will help any of you that happen to score a pair of these at your next estate sale or flea market. Since purchasing my first pair on a whim, having no idea what they would become, I've found 2 more pair. None costing more than $2 for the pair!
I started by removing the "foot" of the crutch and measuring the width I would need between the two crutches at the top. I then cut two pieces that would hold the crutches together at an angle, if I'm making any sense.
Like this:
The hardware used to attach the pieces to the crutches are original. They were used to attach the "feet" to the crutches.
Next I cut a piece of wood to serve as the base for the lamp, attaching the crutches together at the bottom. I chose some screws I had lying around that matched the look I was going for and after drilling some pilot holes, I screwed the base on.
Then I needed to add some height to the top so that my lamp shade wouldn't sit too low. You could either use a dowel like I did, or just purchase a longer threaded nipple like these.
I chose a dowel for this because the nipple that I had was only about an inch and a half.
This is not scientific by the way. If you think I'm any sort of professional let me set you straight on that one right now. I make a lot of mistakes and I choose to learn from them instead of let them ruin me.
I just made a roundabout measurement and took the dowel to the saw and stained it to match my crutches. Then I attached my nipple to the dowel by drilling a hole all the way through the dowel so the lamp cord can snake through the whole thing.
Finally, I purchased this lamp cord from Amazon for this lamp because I wanted the "fancy" look of the Rayon covered cord, but for the second lamp I made I found this one from Lowes which was half the price. I chose the 12ft cord because I wanted enough length left over to be able to reach an outlet without having too much trouble. I followed the instructions on the package of the socket I purchased, also from Lowes.
I did choose to staple my cord along the back of one crutch because I liked the way it looked that way, but you could always run the cord through the base piece and have it run straight down the middle.
I did choose to staple my cord along the back of one crutch because I liked the way it looked that way, but you could always run the cord through the base piece and have it run straight down the middle.
And voila! Slap a shade on this bad boy and screw in a light bulb. You've got yourself a one of a kind, homemade statement piece that (if done right) cost less than $30.
I hope you found this post helpful and I'd love your feedback! Leave me any comments on ways you think I could improve this blog and be sure to tell me about any upcycles you've recently created!
Thank you for reading!
Little Mitten Girl


Comments
Post a Comment